
We’ve all been there. You’re scrolling through an online store, a product catches your eye, but the photos just… fall flat. Blurry, poorly lit, or plain uninspired. Suddenly, that must-have item feels like a risky purchase. In the hyper-competitive world of eCommerce, a picture isn’t just worth a thousand words; it’s worth a sale. For you, as a Shopify merchant, great photography isn’t a luxury—it’s the bedrock of trust and desire.
So what do you do if you don’t have a Hollywood-sized budget? What if ‘professional photoshoot’ sounds more intimidating than inspiring? The good news is, you don’t need it. The gap between amateur and amazing is smaller than you think, and it’s not about expensive gear; it’s about technique. This guide is packed with powerful tricks for photography that will transform your product images from simple snapshots into conversion-driving assets. To truly make your product photos speak volumes and effectively engage customers, consider exploring comprehensive visual merchandising guidelines. We’ll blend timeless composition rules with modern workflows to help you create visuals that not only look incredible but also build the confidence your customers need to click ‘add to cart’.
1. Rule of Thirds: The Simple Grid for Pro-Level Shots
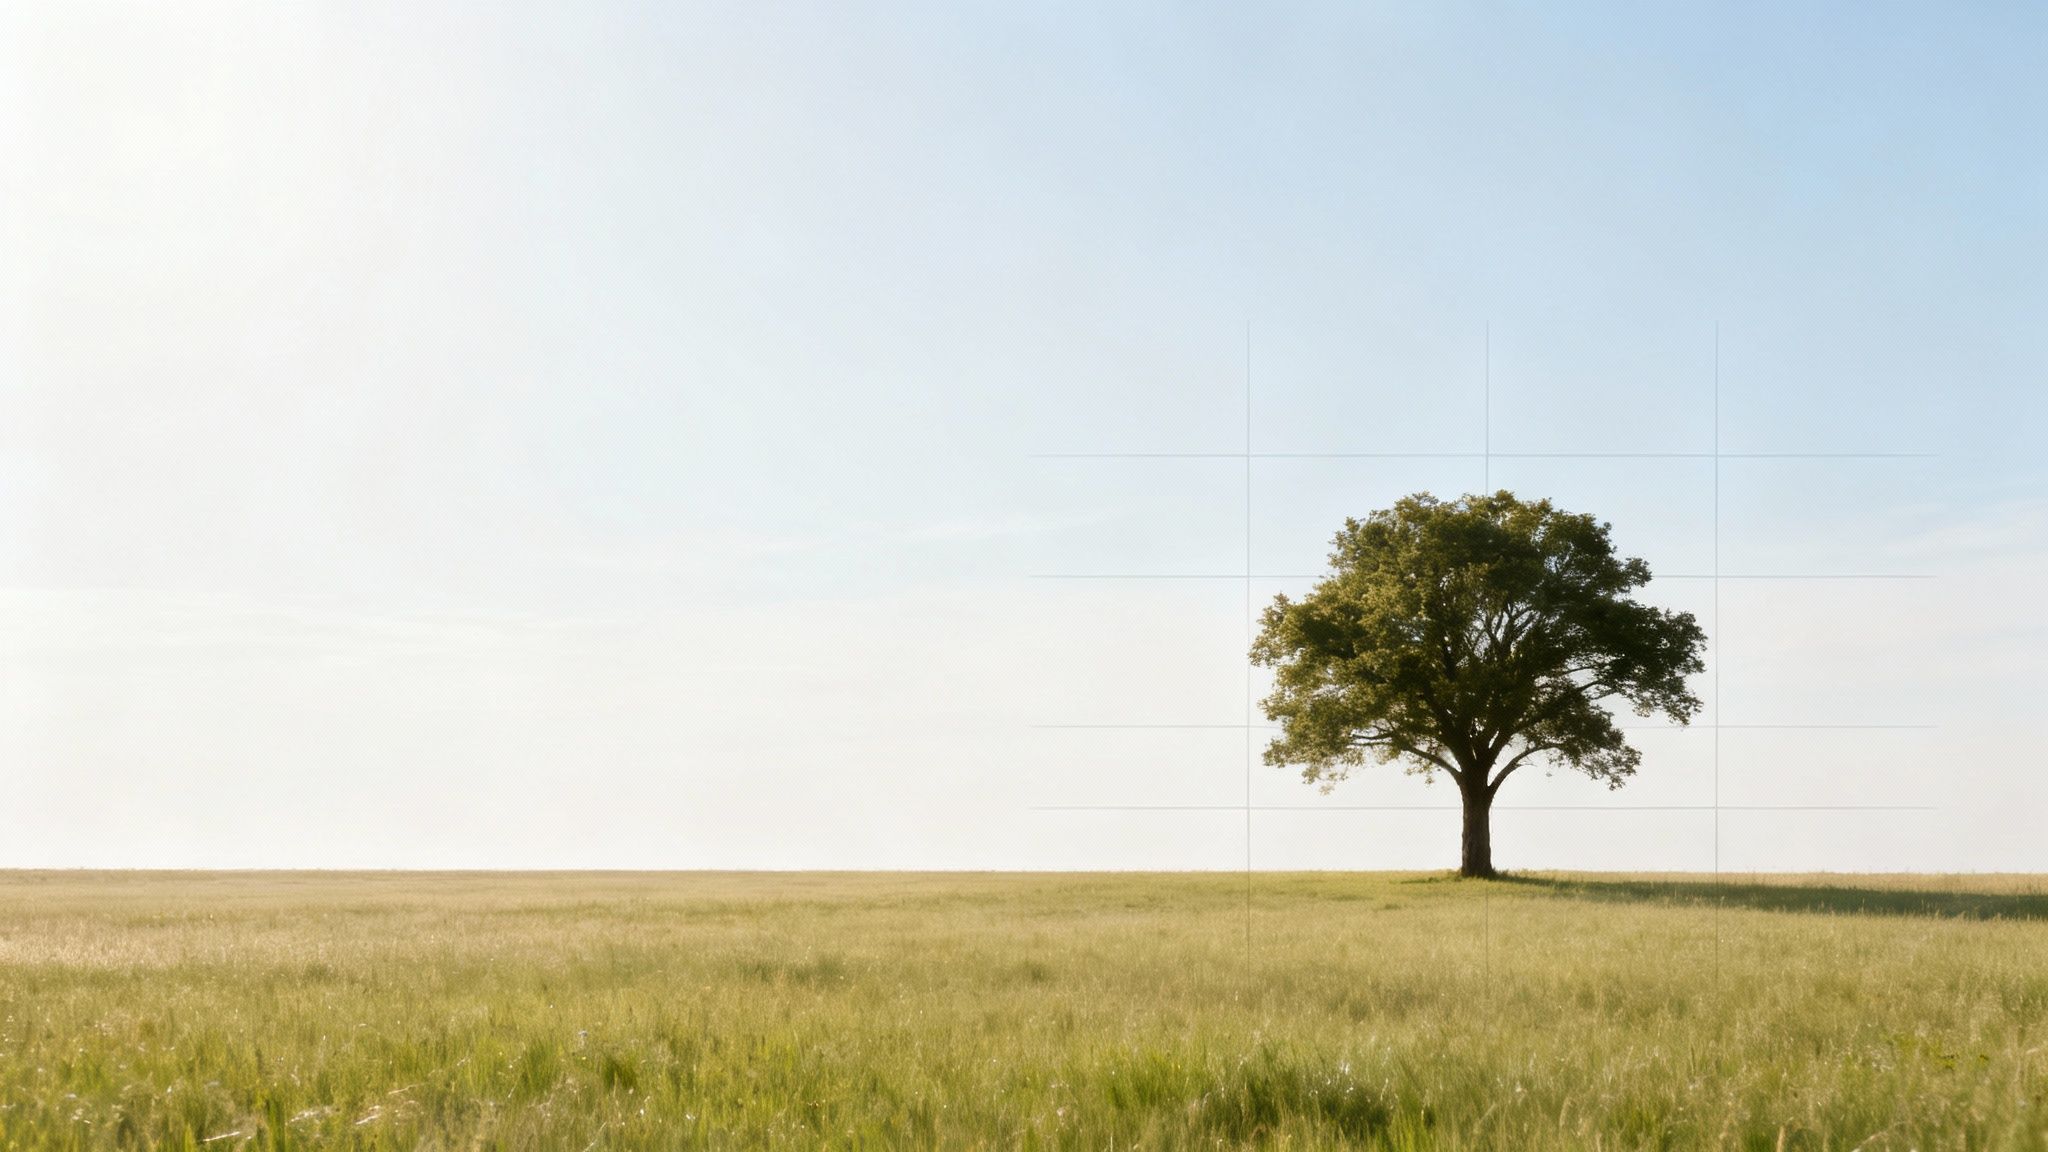
Forget the idea that professional-looking photos require complex setups. One of the most powerful tricks for photography is also one of the simplest: the rule of thirds. It’s your secret weapon against the flat, static, and uninspired product shots that fail to stop a customer’s scroll.
Imagine a simple 3×3 grid overlaid on your image, like a tic-tac-toe board. Instead of placing your subject dead center, you position its most important elements along these lines or where they intersect. This small tweak instantly creates a more dynamic, balanced, and visually engaging image. It subconsciously guides the viewer’s eye, making your products feel more intentional and professionally presented.
Why it works for your store
This technique creates a sense of movement and narrative. By placing a garment’s key feature, like an intricate collar on a blouse, on an intersection point, you’re telling your customer exactly where to look. Aligning a model’s gaze with the top horizontal line adds a layer of human connection, making the photo feel more relatable and less like a stock image.
How to do it today
- Enable Your Grid: Virtually every smartphone and digital camera has a grid overlay option in its settings. Turn it on. This lets you compose your shots with the rule of thirds in real-time.
- Shoot Apparel Intentionally: For a shirt or jacket, place the model’s silhouette along one of the vertical third lines. This creates an elegant, elongated look that feels more like a fashion editorial than a simple product photo.
- Crop in Post-Production: Didn’t get it perfect in-camera? No big deal. Use the crop tool in your favorite editing app to reframe your image and apply the rule of thirds after the fact. It’s a quick fix that makes a massive difference.
2. Golden Hour Photography: Magical Light That’s 100% Free
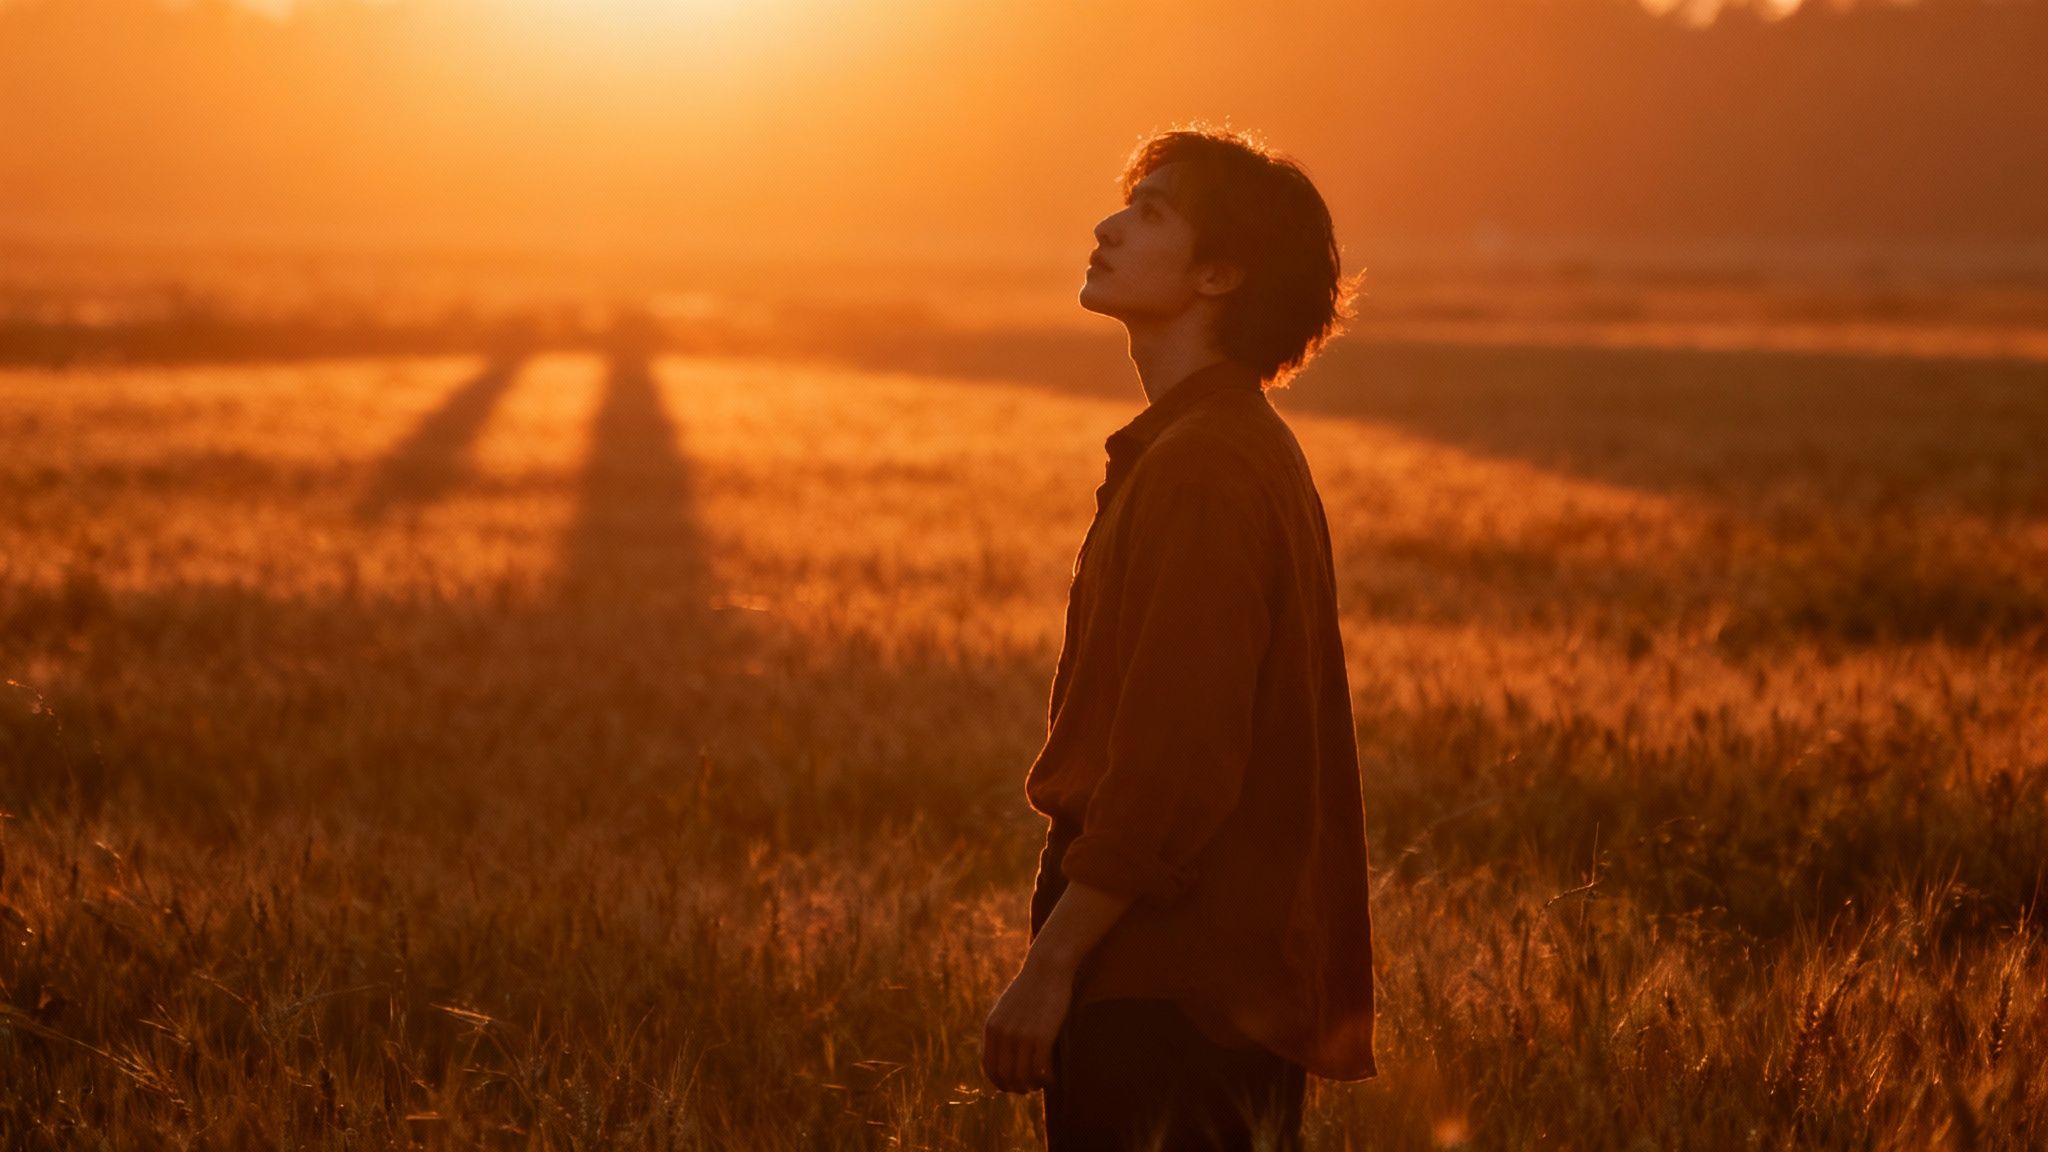
What if the best lighting for your apparel shots wasn’t found in expensive studio kits, but was available for free every single day? Welcome to the magic of golden hour, one of the most revered tricks for photography. It’s that brief, precious period just after sunrise and before sunset when the sun casts a soft, warm, and utterly enchanting light that makes everything look better.
This isn’t just about a pretty sunset; it’s about leveraging directional, diffused light that minimizes harsh shadows and renders skin tones beautifully. The low angle of the sun creates long, dramatic shadows and a warm, golden hue that infuses your photos with a professional, high-end feel. It’s the secret sauce that transforms a simple outdoor shoot into an atmospheric, captivating scene that stops scrollers in their tracks.
Why it works for your store
For apparel brands, golden hour adds an instant layer of luxury and emotion. The warm tones can make fabrics like cashmere or linen look incredibly inviting, while the soft light flatters every model, reducing the need for heavy retouching. This natural, romantic aesthetic is perfect for your lookbooks and social media, creating a lifestyle narrative that helps customers envision themselves wearing your pieces.
How to do it today
- Time It Perfectly: Use an app like PhotoPills or just Google “golden hour [your city]” to find the exact sunrise and sunset times. Arrive at your spot at least 20 minutes early to set up—the best light is fleeting.
- Create a Backlight Effect: Position your model so the sun is behind them. This creates a stunning “rim light” or halo effect around their hair and the silhouette of the garment, making them pop from the background.
- Shoot in RAW: If your camera allows, shoot in RAW format. This captures way more data, giving you more flexibility to perfect those warm tones during editing without losing quality.
3. Leading Lines: The Visual Pathway to “Add to Cart”
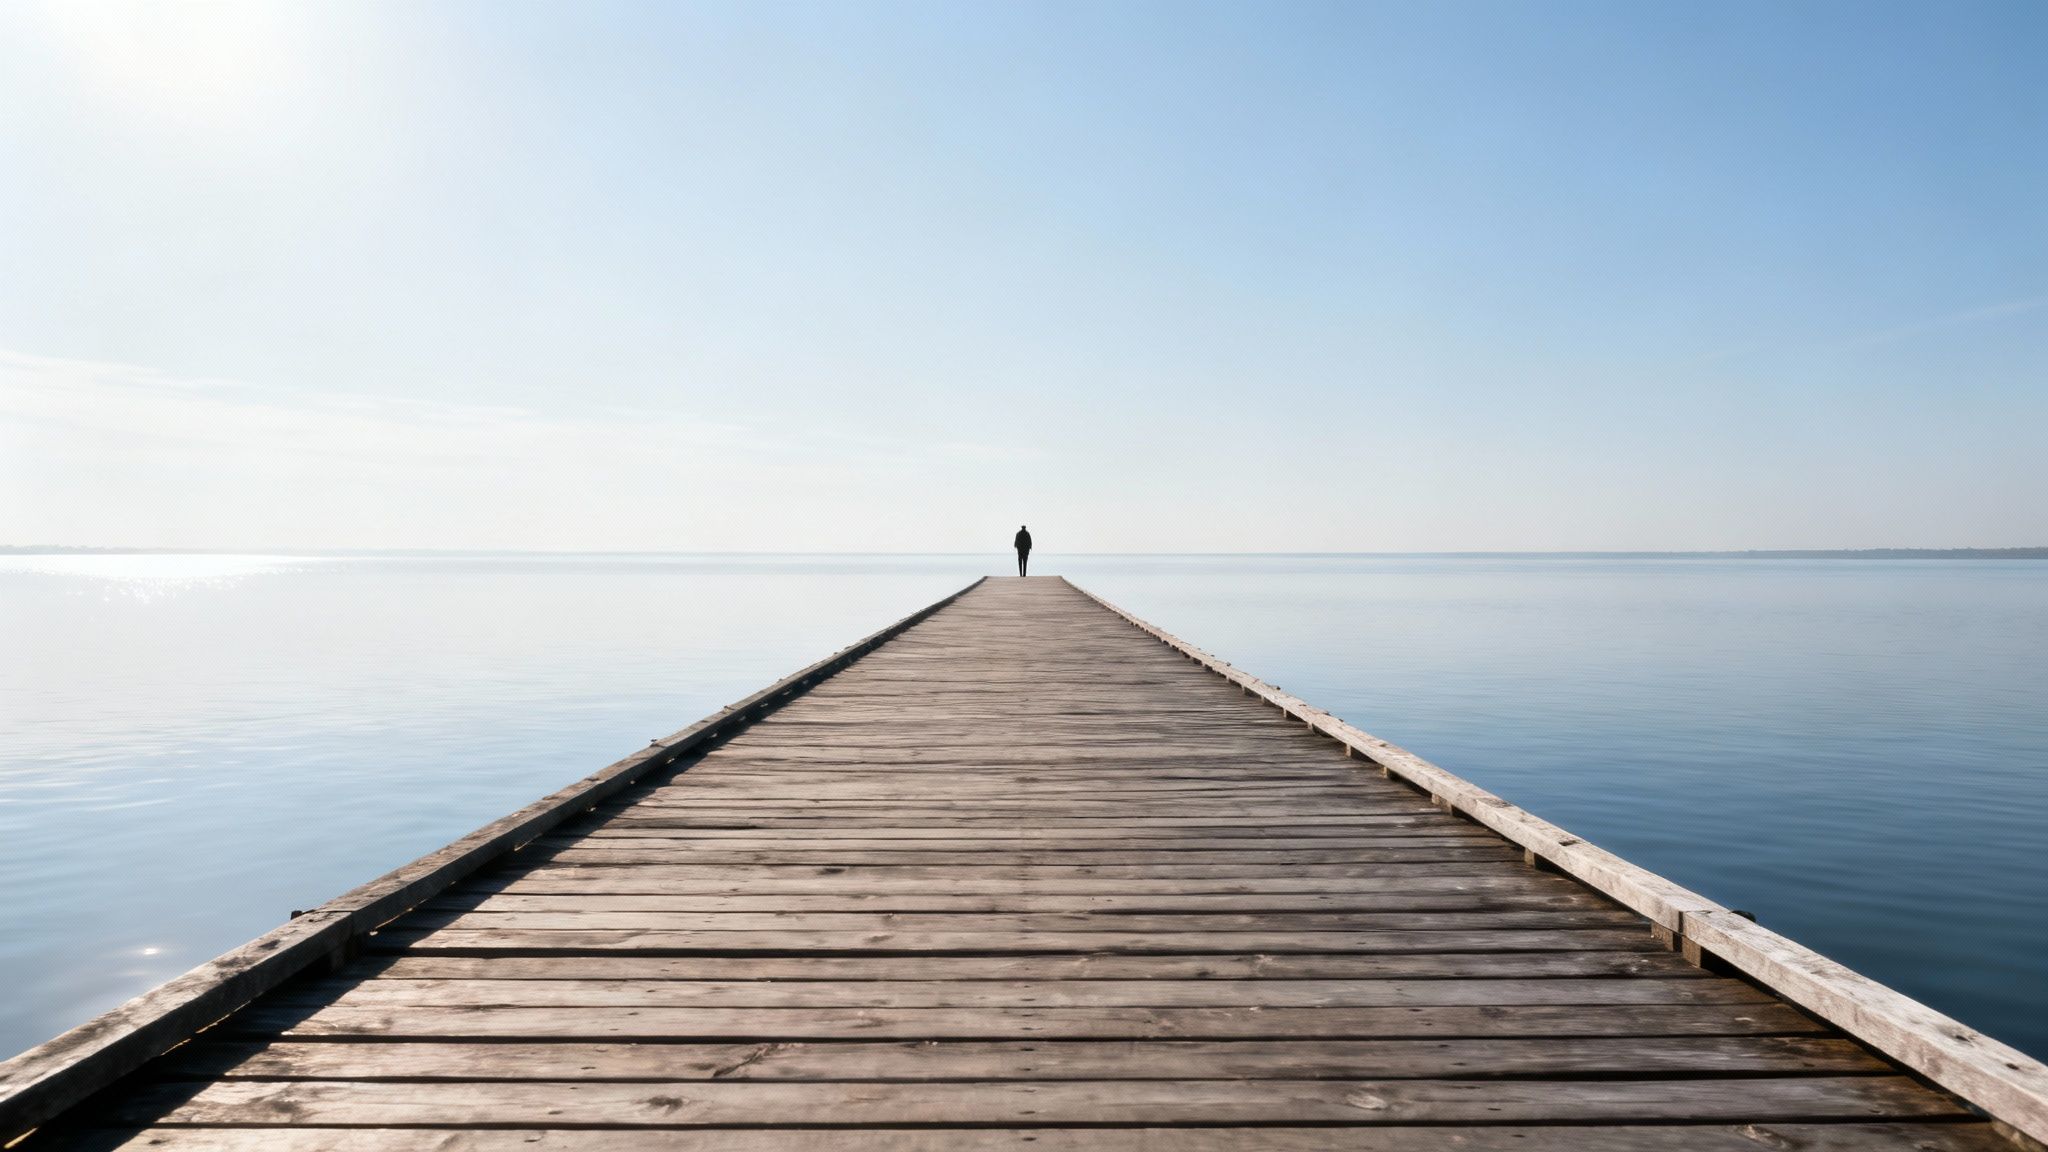
Great photography doesn’t just show a product; it guides the customer’s eye directly to it. Leading lines are one of the most effective tricks for photography because they act as visual pathways, drawing attention precisely where you want it. This technique uses natural or man-made lines within your scene—like a path, a railing, or even the seam of a garment—to create a powerful sense of depth and direction.
This compositional tool transforms a simple product shot into a compelling visual journey. Instead of passively viewing an item, the customer is actively led through the image, with their focus landing intentionally on your product. It’s a subtle but powerful method for making your apparel feel like the destination.
Why it works for your store
For apparel, this technique builds a narrative. The lines of a city crosswalk can lead to a model’s stylish new boots, while the railing of a staircase can guide the eye up toward an elegant blouse. This creates a more dynamic, lifestyle-oriented photo that helps customers envision themselves wearing your products in the real world. It makes the shot feel deliberate and professional.
How to do it today
- Scout Your Locations: Before a shoot, look for natural lines in your environment. Staircases, fences, roads, and architectural details are all powerful tools. Position your model or product at the end of these lines.
- Use Props Creatively: Don’t see any lines? Create them. A strategically placed scarf, a row of books, or even the shadow from a window can serve as a leading line to highlight a product’s best feature.
- Emphasize with Angles: Experiment with your camera position. Shooting from a low angle can make lines appear more dramatic and converge more quickly, strengthening their guiding effect and adding a high-fashion feel.
4. Depth of Field: Creating That Dreamy, Professional Look
One of the most impactful tricks for photography is mastering depth of field to create that professional, high-end look where your product is sharp and the background is beautifully blurred. This technique instantly elevates an image from a simple snapshot to a polished photograph, drawing the viewer’s eye exactly where you want it.
Controlling depth of field means you’re choosing what part of the image is in sharp focus. A “shallow” depth of field creates a soft, out-of-focus background, making your subject pop with stunning clarity. This effect adds a three-dimensional quality to your photos, isolates your apparel from distracting surroundings, and gives your product shots a luxurious, editorial feel that customers associate with premium brands.
Why it works for your store
This technique is a storyteller’s dream for apparel. A shallow depth of field can highlight the intricate knit of a sweater or a unique button on a jacket. It directs the customer’s focus, creating a visual hierarchy that screams “look at this detail.” This is essential for conveying quality without saying a word. To truly make your subject pop, explore advanced techniques to blur backgrounds like a pro in photos and video.
How to do it today
- Use a Wide Aperture: Set your camera to Aperture Priority mode (A or Av) and choose the lowest f-number available (like f/1.8 or f/2.8). This opens up the lens, creating that beautiful blur. Investing in good cameras for product photography with wide-aperture lenses is key.
- Increase the Distance: Physically move your model or mannequin further away from the background. The greater this distance, the more pronounced the blur will be.
- Leverage Portrait Mode: Don’t have a DSLR? Most modern smartphones have a “Portrait Mode” that digitally simulates a shallow depth of field. It’s a fantastic, one-tap solution for achieving this pro look on the fly.
5. Framing: Adding Depth and Focus to Your Shots
Let’s move beyond the flat, one-dimensional product photo. A powerful compositional trick is using a frame within your frame. This technique involves using elements already in your scene—like a doorway, an archway, or even tree branches—to create a secondary frame around your subject. It’s a storytelling device that adds layers, depth, and a sophisticated sense of focus.
This is one of the most effective tricks for photography because it naturally directs the viewer’s eye. By creating a visual border within the image itself, you eliminate distractions and build a stronger connection between the customer and your product. The frame adds context and transforms a simple photo into a curated, intentional scene that feels both artistic and professional.
Why it works for your store
For your brand, framing a model in a doorway can evoke a specific lifestyle or mood, making the garment more aspirational. An accessory placed on a table and shot through the foreground of a plant adds a touch of organic elegance. This gives your products a sense of place, making them more memorable than those shot against a plain white background.
How to do it today
- Scout Your Location: Before shooting, look for natural frames. A window, an archway, a gap between two buildings, or even the branches of a tree can serve as a powerful compositional element.
- Create a Foreground: Place your model or product so the framing element is in the foreground. This creates an immediate sense of depth and draws the eye inward toward the main subject—your apparel.
- Use Props as Frames: You don’t always need architecture. Experiment with props like mirrors, open books, or even the shape of a high-quality photography background cloth to create unique and compelling frames.
6. Backlighting: Adding Drama and Dimension
Want to elevate your shots from flat product listings to dramatic, high-fashion statements? Backlighting is the trick that separates amateur from artist. This technique involves placing your main light source behind your subject, creating a brilliant halo effect, or “rim light,” that outlines their form and separates them from the background.
This isn’t just about looking cool; it’s a powerful tool for adding depth and sophistication. The glowing outline immediately draws the eye, highlighting the texture of a fabric or the silhouette of a garment. It’s one of the most effective photography tricks for making your subject pop, turning a simple photo into a memorable image.
Why it works for your store
For apparel, backlighting is a game-changer. It accentuates the shape and cut of clothing, making the silhouette the hero. This is especially effective for highlighting delicate fabrics like silk or garments with interesting textures, as the light catches the fine details. It creates a high-end, editorial feel that can significantly boost the perceived value of your products.
How to do it today
- Go for Gold: Use the golden hour for natural, warm backlighting. Position your model so the sun is behind them to create a beautiful, ethereal glow.
- Add a Fill Light: To avoid your subject becoming just a dark silhouette, use a reflector or a secondary, less powerful flash from the front. This will gently illuminate their face and the front of the garment while keeping that dramatic rim light.
- Experiment with AI: Recreating this effect consistently can be tough. Advanced tools like those used for AI product photography can help you generate stunning, perfectly backlit scenes without complex setups.
7. HDR: Mastering Tricky Lighting Like a Pro
Ever tried to photograph a white blouse against a bright window, only to get a silhouette or a completely blown-out background? High Dynamic Range (HDR) photography is the advanced trick that solves this exact problem, ensuring every part of your image—from the darkest shadows to the brightest highlights—is perfectly detailed.
The technique involves taking multiple pictures of the same scene at different exposure levels: one too dark, one just right, and one too bright. These images are then merged into a single HDR photo, creating a final shot with an incredible range of color and detail that a single exposure could never capture. It’s how you get professional, evenly lit product photos even in challenging light.
Why it works for your store
For apparel, this means the delicate texture of a dark wool sweater and the subtle sheen of a silk scarf can coexist perfectly in one shot. It eliminates the tough choice between exposing for the product or the background, giving you a polished image that looks like it came from a major brand’s catalog. This technique is a game-changer for lookbooks featuring complex indoor and outdoor scenes.
How to do it today
- Use a Tripod and Auto-Bracketing: Stability is key. Place your camera on a tripod and find the “Auto Exposure Bracketing” (AEB) setting. This tells your camera to automatically capture the sequence of shots.
- Merge in Editing Software: Import your bracketed photos into a program like Adobe Lightroom or Photoshop. Use the “Photo Merge > HDR” function to automatically combine them into one high-detail file.
- Keep it Natural: The goal is realism, not an over-processed, dramatic effect. When editing your final HDR image, adjust the settings subtly to create a balanced, true-to-life photo that showcases your product beautifully.
8. Forced Perspective: Bending Reality to Stop the Scroll
Ready to move beyond standard, flat product shots? Let’s play with perception itself. Forced perspective is a powerful photography trick that manipulates scale and depth to create dramatic, memorable images. It can make a simple garment look larger-than-life or place your products in imaginative, surreal settings that are impossible to ignore.
Forced perspective creates illusions by strategically placing subjects at different distances from the camera. Think of a model appearing to hold a tiny version of your handbag in her palm, or a shoe looking as big as a car. It’s a technique that instantly injects energy and a high-fashion, playful feel into your visuals, making your brand stand out.
Why it works for your store
This technique is storytelling gold. It stops scrollers in their tracks and makes them look twice. Using a low angle with a wide-angle lens to shoot a model wearing boots makes them appear dominant and empowering. For accessories, you can create whimsical scenes where a ring becomes a giant sculpture, making your product unforgettable and highly shareable on social media.
How to do it today
- Go Wide: Use a wide-angle lens (around 14-35mm) and get close to your subject to create dramatic perspective distortion. This is perfect for emphasizing a specific feature, like the sole of a shoe.
- Play with Distance: For forced perspective, place your product very close to the lens and your model or background elements much farther away. Look through your camera to align them perfectly and create your illusion.
- Shoot from Below: A low camera angle, often called a “worm’s-eye view,” naturally enhances distortion. This makes models look taller and products more heroic—a classic trick for lookbooks.
9. Silhouettes: Creating Drama by Embracing the Dark
Sometimes, the most powerful statement a photo can make is by what it doesn’t show. Silhouette photography is a dramatic technique that turns your subject into a dark, crisp outline against a bright, beautiful background. It’s one of the most artistic tricks for photography, transforming a simple garment into a piece of high-contrast art.
This method intentionally underexposes your subject, forcing the viewer’s eye to focus entirely on its shape and form. By backlighting your product, you create an image filled with mystery, emotion, and elegance. The lack of detail draws attention to the iconic outline, making it instantly memorable.
Why it works for your store
For apparel, a silhouette can highlight the unique cut of a jacket or the flowing shape of a dress in a way no standard photo can. It’s an incredibly effective tool for ad campaigns and social media content that needs to stop the scroll. This technique sells a mood and a story, not just a product, making your brand feel more aspirational and art-driven.
How to do it today
- Meter for the Background: Set your camera to meter the brightest part of your scene, like the sky at sunset. This tells the camera to darken everything else, creating the silhouette effect automatically.
- Position for Clarity: Place your model or garment against an uncluttered, bright background like an open sky or a large window. Ensure the outline is distinct and recognizable.
- Embrace the Golden Hour: Shoot during sunrise or sunset when the low-angle sun provides the perfect natural backlight. This not only creates a stunning silhouette but also bathes your background in warm, compelling colors.
10. Motion Blur: Capturing Life, Not Just Images
Static product shots can feel lifeless. To truly captivate your audience, you need to convey emotion and energy. One of the most artistic tricks for photography is embracing intentional motion blur. Instead of freezing every moment, this technique uses movement to tell a story, making your products feel dynamic and alive.
Imagine a flowing scarf or the graceful swing of a jacket captured not as a still object, but as a fluid line of color. By using a slower shutter speed, you can transform a simple action into a visual narrative. This method captures the essence of how apparel moves with the body, adding a high-fashion quality that standard, crisp images often lack.
Why it works for your store
For apparel, motion blur showcases a fabric’s drape and flow in a way no static photo can. It suggests a lifestyle and an experience, not just a product. A slight, elegant blur as a model walks or turns can make a dress feel ethereal and luxurious, while a sharp pan following a running shoe conveys speed and performance. It’s about selling the feeling of wearing your product.
How to do it today
- Stabilize Your Camera: Mount your camera on a tripod. This is crucial. You want the background sharp while your subject’s movement creates the blur.
- Adjust Your Shutter Speed: Switch your camera to Shutter Priority mode (‘S’ or ‘Tv’). Start with a speed around 1/15th of a second and experiment. A slower speed creates more blur.
- Direct the Movement: Ask your model to perform a specific, repeatable action, like walking, spinning, or tossing their hair. This controlled movement gives you the best chance to capture the perfect, artful blur.
Top 10 Photography Tricks Comparison
| Technique | 🔄 Complexity | ⚡ Resource Requirements | ⭐ Expected Outcomes | 💡 Ideal Use Cases | 📊 Key Advantages |
|---|---|---|---|---|---|
| Rule of Thirds | Low 🔄 — easy to apply | Low ⚡ — no gear needed | ⭐⭐⭐⭐ — more balanced, dynamic images | Landscapes, portraits, street | Fast to learn; built-in grid overlays |
| Golden Hour Photography | Low 🔄 — timing-dependent | Low ⚡ — time + planning | ⭐⭐⭐⭐⭐ — flattering, warm mood and soft light | Portraits, weddings, landscapes | Natural flattering light; minimal artificial fill |
| Leading Lines | Medium 🔄 — requires composition planning | Low ⚡ — scene-dependent | ⭐⭐⭐⭐ — strong depth and directional focus | Architecture, landscapes, street | Guides viewer eye; enhances depth and narrative |
| Depth of Field Control | Medium 🔄 — requires aperture/focus control | Moderate ⚡ — fast lenses beneficial | ⭐⭐⭐⭐⭐ — precise subject isolation, professional look | Portraits, macro, product | Strong subject separation; creates bokeh and focus control |
| Framing Within Frame | Medium 🔄 — scouting and positioning | Low ⚡ — uses scene elements | ⭐⭐⭐⭐ — layered compositions and added context | Travel, interiors, documentary | Adds depth and storytelling; natural emphasis |
| Backlighting and Rim Lighting | Medium-High 🔄 — precise positioning/exposure | Moderate ⚡ — reflectors/flash helpful | ⭐⭐⭐⭐ — dramatic separation and dimensionality | Portrait, fashion, wedding | Creates halo/rim effects; separates subject from background |
| Exposure Bracketing & HDR | High 🔄 — multiple shots + post-processing | High ⚡ — tripod + HDR software/time | ⭐⭐⭐⭐ — wide tonal range, detail in extremes | Real estate, landscape, architecture | Recovers highlights/shadows; accurate detail in high-contrast scenes |
| Perspective Distortion & Forced Perspective | Medium-High 🔄 — careful positioning | Low ⚡ — usually no special gear | ⭐⭐⭐ — creative, attention-grabbing effects | Travel, creative portraits, social content | Creates optical illusions and dramatic scale shifts |
| Silhouette Photography | Low-Medium 🔄 — exposure control needed | Low ⚡ — relies on backlight | ⭐⭐⭐⭐ — strong, memorable shapes and mood | Sunset scenes, portraits, fine art | Emphasizes outline and drama; minimalistic impact |
| Motion & Blur Techniques | Medium-High 🔄 — shutter control and technique | Moderate ⚡ — tripod, ND filters often needed | ⭐⭐⭐⭐ — conveys motion, energy, and time | Sports panning, waterfalls, light trails | Adds movement and narrative; produces dynamic visuals |
From ‘Tricks’ to Trust: Turning Your New Skills into Sales
You’ve just explored a deep arsenal of tricks for photography, moving far beyond simple point-and-shoot methods. From mastering the dramatic shadows of the Golden Hour to using leading lines that guide a customer’s eye directly to your product’s best features, these techniques are your new creative toolkit. We’ve deconstructed concepts like depth of field, framing, and backlighting, transforming them from abstract ideas into concrete strategies you can implement tomorrow. Think of each technique not just as a way to take a better picture, but as a way to tell a better story about your brand.
The journey from a curious browser to a loyal customer is paved with moments of connection and confidence. Mastering these tricks for photography is the foundational step. A beautifully executed silhouette shot can evoke a feeling of elegance, while a dynamic motion blur photo can communicate energy and freedom. These aren’t just aesthetic choices; they are powerful tools for building brand perception and communicating value before a customer even reads your product description. Your photography becomes the visual handshake—the first promise of quality you make to your audience.
The Real Goal: Building Customer Confidence
Ultimately, every technique, from controlling exposure to playing with perspective, serves one primary purpose in eCommerce: to build unwavering trust. You are asking a customer to make a purchase without ever physically touching the garment. Your images must do the heavy lifting, bridging that gap between the digital and the tangible. They must answer unspoken questions about fabric texture, garment drape, and true-to-life color. When your photos are sharp, professional, and emotionally resonant, they signal that you are a brand that cares deeply about quality and transparency.
Your newfound skills in composition and lighting will attract shoppers, but the ultimate conversion hinges on eliminating their final doubt: “Will this actually look good on me?” This is where brilliant photography meets intelligent technology. By pairing your stunning new visuals with a virtual try-on experience, you close that final gap in the customer journey. You’ve used artistry to capture their attention; now you can use technology like Icona to give them the personalized confidence they need to click “add to cart.” You’re not just selling clothes; you’re selling the feeling of wearing them.